I've never done this before, but I thought, since I was taking on a big project like this, I should document it so I have record of how it all either fell apart or came together. In my case, it all came together in the end!

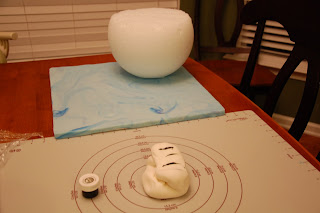
Here is the board and 2/3 of a large styrofoam ball that I leveled the bottom and chopped off a 1/3 of the top. I guess pretty accurately and nailed it so the top of the ball would have a diameter of 9 inches, perfect for my 9 inch cake!

Then I marbled some fondant to create the water effect for the base.

Sorry the lighting is awful at night in the kitchen.

Here is the second color ready to be mixed in for the continents.

I printed off a picture of both North and South America and Antarctica. Cut roughly around the edges and after rolling out my fondant I took a toothpick to trace around the paper to create the continents.

I forgot to take a picture before I starting carving,
but here is a 9 inch, 8 inch and a 6 inch cake that I carved to make the shape of the body.

Then I learned/read about a trick, thanks to Sharon Zambito from
This is a chocolate ganache candy coating to the cake, it is supposed to form a harder shell and be better to adhere fondant too. And great for odd shaped cakes like this one!
It's 2 parts chocolate to one part cream.
Heat the cream, pour over the chips, stir till melted and let sit overnight to a peanut butter consistency. Then spread onto cake with a hot spatula.
However, in my case, I don't think my cream was hot enough, my chocolate did not melt all the way, you can see the clumps of chocolate on the cake. But applying it with a hot spatula did seem to help with that some, but lessoned learned for the next time!

Here is the belly of the penguin covered in white Satin Ice fondant.

Here is the penguin with his head made of Rice Krispies and also covered in fondant. And the rest of his "tuxedo" is on too.

Ta Da!!!
The final product!!

Here is a view of the two continents with my best guess as to where each of his ports were.
Oh yeah, I tried to quickly make a small model of his ship with the words Celebrity on it, in port in Seattle, where he started his journey.

The penguin with his party hat.


Here I used a small silicone clay mold that I got for a dollar at A.C.Moore in their clearance section. I pushed fondant into the mold, scrapped off the excess and popped the letters out!

The penguin stood about 2 feet tall and that was including his party hat.
TLC Ultimate Cake Off, here I come!!

Couldn't forget his arms and his cute tail!!

Welcome Home Thomas!

Uncle Thomas with his favorite (and only) niece and nephew!

Oh wait...the fun part...taking it apart.
Here I am taking off his head!

Poor penguin...but the cake was delicious, especially with the chocolate ganache!
I learned a lot with making this cake.
Many, many hours went into a project like this, but I had fun!
P.S. Why did I make a penguin cake for him??
While he was on his trip he got a chance to see many different types of penguins up close and from afar. And for those of you who know him, he has this penguin puppet that he got somewhere. So to make his trip fun for him and for us back home, he would take pictures of Winston (yes that was his name) and had a blog that he would post the pictures to. So my kids and us would check out the daily adventures of Winston. Hence the idea for the penguin cake!


0 comments on "March of the....Penguin? Happy Birthday Thomas!"
Post a Comment